Wednesday 31 October 2012

A little bit of Canadiana

This is what my living room looks like. We don't have any furniture in it as we put all our old living room furniture down in the basement rec room when we moved back into the house. And that's where it's going to stay since it was looking a little worse for wear.


So right now the living room is acting as a staging area for a lot of the home improvement stuff. The antique doors for the closet in the main entryway are leaning against the wall on the right waiting to be refinished, and the glass inserts for the doors are over on the left, waiting to be frosted. I think that they'll be my weekend project. 

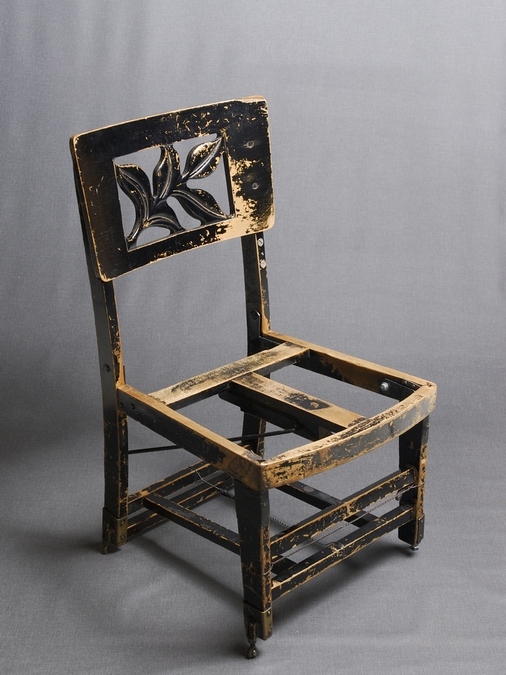
But this week I've been working on this little folding chair that I bought at auction many years ago. It was in pretty rough shape, and it's  been hanging around in one of the closets on the third floor for almost a decade waiting for me to do something with it. I figured it was time. 


I was curious about the origins of the chair, so I did a little internet research.  Hourd & Company was a furniture manufacturer in London, Ontario in the early to mid 1900's. They manufactured folding tables and chairs and crokinole boards (image from here). 


It was recently discovered that Glenn Gould spent his entire career using a Hourd chair that his father modified for him. You can read about it here. This is the Gould chair and it's now on display in Ottawa at the National Arts Centre.


You can buy a mint condition vintage Hourd & Company chair of the same style as the Glenn Gould one on eBay right now for $10,000. No kidding. Here's the ad.

Since my style of chair has no Glenn Gould cachet, and apparently very little value (I found a set of four that sold at auction for $20 and I think that I payed under $10 for mine), I decided to go ahead and give it a complete makeover. A few of the joints were wiggly, so I used wood glue to firm them up. I then gave it a good sanding, a coat of primer, and three coats of Para Whitewash White in an alkyd so that it would wear well. 

And here it is all cleaned up.


Now I just need to find some fabric to cover the seat. I plan to put it in the bathroom in the basement, and I'd love to get some really bright, fun fabric to use.

I've been browsing the Tonic Living website. As you can see, I'd like to get something with an aqua tone in it to coordinate with the glass tiles in the shower.


I'm kind of partial to the owls. What do you guys think?

Tuesday 30 October 2012

Glad it wasn't us!

I was a little disappointed this morning when Hurricane Sandy seemed to have died out and there was blue sky peeking through the clouds. I was kind of hoping for a storm-day to spend at home with the kids.

The wind in the night was sure exciting, though. At one point I was woken by a big crash and metal crunching, and got out of bed to check if it was one of the limbs overhanging our front porch. The huge, 100+ year old maples that line our street are getting quite straggly, and branches coming down in storms are a common occurrence. I couldn't see anything on the street and the limbs overhanging our house were all fine so I just went back to bed.

This morning, when we left for school, we discovered this in front of our next-door neighbour's house.


Miraculously, the hydro wires weren't pulled down and there didn't seem to be any damage to either roof. The ugly little black iron fence bore the brunt of the damage - but that's no big loss.

And now the kids appreciate why I make them scurry down the street on very windy days!

Monday 29 October 2012

Before and After - the bathroom

I thought that it would be fun to post some before pictures of the bathroom. Just so everyone can see what a huge step up it is for us.

The old bathroom was a tiny room right at the top of the stairs. It was only about 40 square feet - incredibly small for a family of four. But just the right size for a laundry room for said family, which is what we changed it into.

The plans for the building permits (that I did myself to save many thousands of dollars - and they all passed inspection for the permit process!) show the old and new layouts for these two rooms. We didn't make any other changes to the second floor.


The bedroom right next to the old bathroom was Matthew's. I spent a lot of time at the end of last year convincing him how cool it would be to have his bedroom up on the third floor. Initially he wasn't keen on moving up, but a little paint and some new carpet (and secretly moving everything he owned up there while he was at school one day) made him see the light. And he's been happily ensconced up there in his cozy new room ever since.

The next floor plan shows the current layout. The old bathroom is now the laundry room and the new bathroom was the adjacent bedroom. In the picture below, the bathtub along the short wall next to the closet is actually the walk in shower. I couldn't figure out how to make Floorplanner put in a shower, so I used the closest thing I could find and the building department didn't seem to mind.

The linen closet next to the walk in shower is also the same depth as the shower, not narrower as pictured here, and the laundry and bathroom doors are pocket doors, so there's no swing. 


The view from the hallway into the old bathroom shows how tight it was. You can see the shower curtain for the tub hanging to the left of the door. I made the vanity from an antique dresser and a vessel sink as I had a really hard time finding a decent vanity small enough to fit into the space.


 I did love that vanity, even if the taps were always loose.


I guess the one advantage of the old bathroom was that you could take care of all of your business at once. Sit on the toilet and wash your hands, brush your teeth, etc., all from a seated position. And yes, it really was as tight as it looks.  

I was frequently bruised on my left bicep from ramming my arm into the moulding halfway up the wall on the corner by the toilet. And I only had myself to blame because I was the genius who installed it. It looked pretty, but packed a killer punch.

And a look back from the vanity towards the door reinforces how tiny the space was (and how pointy the killer corner was). You can imagine how difficult it was to get two kids and two adults ready in the morning. 


When you compare the old bath to this


you can imagine how happy I am.

Sunday 28 October 2012

Happiness is...

A nice warm bath, clean pyjamas, a good book, and your best friend.

Life doesn't get much better than that.


Saturday 27 October 2012

Finally finished!

After weeks of talk about finishing the upstairs bathroom, it's finally done. I don't know why I procrastinated for so long - once I finally got down to it, it only took a few hours. 

And here it is! The floor looks really dark in these pictures, but it's more of a medium slate blue-grey. I love the contrast of the white fixtures against the darker floor.


Ignore the hanging pot light in the shower - apparently the housing is in our contractor's shed and we're waiting for him to drop it off.

The shower is amazing. We chose plain white subway tile for the walls, but had it grouted in a silver colour to tone it down a bit. We had a basketweave marble mosaic laid in the bottom and used darker grey grout that matches what was used between the slate tiles on the bathroom floor.


At Matthew's request we had a rain shower head installed, along with a more traditional sprayer shower head.


I love my new vanity. Since this is the only bathroom aside from the basement, it needed to be large enough for everyone to use in the morning - sometimes all at the same time. It used to be such a struggle trying to squeeze past one another when everyone was trying to brush their teeth and wash up. Now, there are two sinks, lots of storage, and plenty of floor space.


The photograph you can see reflected in the mirror was taken by by brother-in-law. You get great gifts when you have a photographer in the family!


I also hung up a picture that used to hang in the sunroom above the bathtub. It's an amazing in-camera double exposure done by a local Toronto artist. It was taken in India - he took a picture of a woman standing on the steps of a temple, and then re-exposed the same film frame to capture light reflecting off a river. In the days of Photoshop, it's amazing to see someone with the talent to do interesting manipulations right in the camera.


And in case you didn't notice, we have a chandelier hanging above the bathtub. That was our contractor's idea, and of course, once he'd suggested it, I had to have it. Alan thought it was a ridiculous idea, but I did it anyway!


So there you have it. I can finally cross one room off my list.

Next up - the front hallway. I should be able to make some good progress on this cold, dreary, rainy day.

Wednesday 24 October 2012

Cooking with Cal

This is how I spent my evening.


Cal asked if we could do some baking and we decided on Magic Cookie Bars. My friend Kathleen gave me this recipe a few years ago, and it's been a staple in our house ever since.

Cal loves to help cook - he's not great at measuring, but he carefully dumps the pre-measured ingredients together and can run the mixer like a champ.


After mixing the shortbread crust you pat it down in a glass pan. I usually use an 8" square pan, but for the life of me couldn't locate one tonight (still not unpacked?), so we used a glass pie plate


and baked it at 350℉ until the edges were golden and the center cooked. Then we poured a can of sweetened condensed milk over the crust and sprinkled it with chocolate chips, chopped up Skor bar, and pecan pieces.


And it went back in the oven until the edges bubbled and the chocolate and nuts melted down into the condensed milk layer. Yummy!


Kathleen's Magic Cookie Bars

3/4 cup butter
1/3 cup sugar
1 1/2 cups white flour

Cream together butter and sugar, and then mix in flour. Spray an 8" square pan and press in shortbread base. Bake at 350℉ until the edges are golden and the middle is cooked.

Pour one can of sweetened condensed milk (I use Beatrice) over the base and then sprinkle with about 1/2 cup of each of the toppings. Bake at 350℉ until the edges bubble, the chocolate has melted, and the center is molten.

We like to top it with Skor bar (or toffee bits), chocolate chips and pecans. You can change up the toppings and use any combination, like sliced almonds, flaked coconut, white chocolate, and dried cranberries.


And this shot just goes to prove that a watched cookie does bake!

And the bathroom is....

....still not finished! My progress seems to have slowed to a snail's pace. Things have been busy at work and the kids have kept me running.

And speaking of running, I finally started  again after a five month blame-it-on-the-reno hiatus. I've  gone out for a few short runs with Tessa. You can call me Queen Multitasker - I figure I might as well kill two birds with one stone and exercise us both.

I did mange to get the linen closet in the bathroom all finished up this weekend. I started this project a couple of weeks ago, and it looked like this - all bare walls and no doors.


You might recall that the doors lay on the bathroom floor for days (maybe a week!?!?) while I primed and painted them.


I had some old wooden shelf boards from an Ikea shelving system we were no longer using hanging around on the porch, so I decided to reuse them in this closet. It saved me from having to go out to the lumberyard, and it it got rid of some stuff that we would have had to store or toss out.

So I dragged my handy old table saw from the basement into the backyard (well, I got Alan to do the heavy work - and by heavy work I mean moving the saw, not actually operating it) and cut the shelves down to fit the closet. They're just under 15" deep - the perfect size for stacking towels and sheets. I cut some 1x4 lumber to use as shelf supports, nailed them to the wall, gave them a coat of primer and two coats of paint in the trim colour, and voila!


On Friday night I ran out to HomeSense to look for baskets or bins. Oh, how I love that place. I found some pretty ones, just the right size for storing bed linens.


On Saturday I unpacked all the rest of our towels and linens that were still in storage. And I did about six loads of laundry 'cause it turns out that I hadn't packed them quite as well as I thought I had. Plus I'd used some of them as drop cloths to cover furniture and other assorted stuff piled in the bedrooms on the third floor during the reno.


Isn't it a thing of beauty? I already had the wicker baskets. The ones on the top shelf hold all of our extra toiletries, and the one on the middle shelf holds our washcloths. All of the small things that are hard to stack and make a closet look messy are neatly tucked away in pretty storage.

So the closet is finished. For now. I'm not completely thrilled with the flat-paneled doors. I feel like they lack a little verve - especially next to the five panel entry door. That door is a pretty close match to the original doors on the upstairs bedrooms. 

I used some small antique glass pulls that I had removed from Matthew's dresser and they look really tiny. I think some more substantial hardware would help to dress them up.


And for the final shot - I love my new pocket doors on the bathroom and laundry room. They are awesome. 


Monday 22 October 2012

Spring Cleaning

I know it's not spring, but Fall Cleaning just doesn't have the same ring to it. I spent the weekend cleaning, and cleaning, and cleaning some more. While I had cleared most of the stuff we had stored in the kids rooms out, I hadn't had a chance to give them a deep cleaning to get rid of the insidious drywall dust.

We had the ILs over for dinner on Saturday for FIL's 79th birthday and my wonderful MIL stayed the night (in our currently hideous guest room in which we basically plowed a pathway from the door to the bed through the stacked piles of junk that have yet to be unpacked) to help me clean the kids' rooms on Sunday.

We started in Matthew's room, pulling everything off the bookshelves, dresser, and bedside table. We vacuumed the baseboards, cleaned out the clothes in his dresser, wiped down all his shelves, and then moved everything back in.

The bookshelves were no mean feat, as this boy has a serious book collection.


Some of those shelves are stacked two-deep. And he has another big bookcase in the hallway right outside his bedroom door.

It's so nice to have everything freshened up. Matthew just moved up to this bedroom on the third floor in January. He was previously in the room that we made into a bathroom and he really didn't want to move upstairs alone. So over Christmas break I repainted both rooms and the hallway on the third floor and we had it carpeted. Right after we moved into the house we had the pine subfloors refinished, and while they were pretty, they weren't very cosy. They weren't in fantastic shape either, so I didn't feel too badly covering them up with carpet.

I love his new room upstairs. It's on the back of the house and has slanting attic ceilings and a fun little nook where his desk is. It's just perfect for a kid.


He's doing a project on a famous person for school - and he chose van Leeuwenhoek. He invented the microscope and is considered to be the first microbiologist. Yet more evidence that the apple doesn't fall far from the tree (Pioneer Germ Fighters was Alan's when he was a boy).

As you could probably tell from his room decor, Matthew has a serious love of the ocean and all the creatures in it. I think that there's a good chance that he'll be a marine biologist when he grows up.

We've been trying to figure out what to do with his huge shell collection. He filled some glass containers for the basement bathroom to try to get some of them out of the way. He has more shells stacked in containers next to his dresser.


And we framed a few of his best specimens that we found on some of our trips to the Carolinas and Florida.


There are  quite a few things to take care of in his room. In no particular order, chores I still need to tackle include:
1.  Put up trim around his window.
2.  Paint the closet door and window trim.
3.  Put a doorknob on his door so that he can get back out if he closes it (this current state does have some advantages!).
4.  Paint the heating vent cover and reattach it to the baseboard.
5.  Build some shelves over his doors and window to display his growing collection of trophies. I hate those ugly things, but he won't let me toss them. I figure if they're up high, I won't notice them, or have to dust them.
6.  Get some artwork up on the painfully bare walls.

But right now I'm not going to think about all that has to be done. I'm going to sit back and admire his shiny clean room. 
Related Posts Plugin for WordPress, Blogger...