Saturday, 27 April 2013

Champion #2!

It's a red letter year for hockey in our household.


Cal's team won the Parkdale Flames house league age division and Matthew's team won the city-wide Select championship tournament this week.


Matthew is thrilled. And Alan is absolutely over the moon. Matthew's team is moving up to Single A level next year, so they're leaving the Parkdale arena (for some reason beyond my comprehension, they can't have a single A team at Parkdale). Last night there was a party at the rink to celebrate the championship and the end of playing for the Flames.

And Matthew, of course, volunteered me to make a cake for the celebration. He was so excited to take a fancy cake that I didn't have the heart to say no. So I stayed up baking until after midnight on Thursday night, and then rushed home yesterday to decorate the cake. 

I used the Campfire Cake recipe that I baked for Alan's birthday, but only made the malted chocolate buttercream to fill it. The toasted marshmallow filling is my favourite, but since I was baking the cake in a 9x13 pan, would only have one layer of filling, and was finishing with marshmallow fondant, I decided to go with the chocolate buttercream.


I used their home team jersey as a template (so they wouldn't be eating a tonne of black fondant) and manufactured a cake version of it.


Matthew was as proud as a peacock taking the cake into the party, so it was well worth all the trouble!

Tuesday, 23 April 2013

The kitchen table

The kitchen table is all finished, and I'm thrilled with how it looks.


When you compare these pictures with the before pictures, it's hard to believe that it's the same table. 

It's sitting in the bay window in the dining room right now, waiting for the varathane to cure. I figure I'll give it at least a week, because it's sure to get a lot of abuse from two small boys in the coming years.

Next up is the seat that I plan to use as a banquette with this table. Goodbye granny fabric!


Monday, 15 April 2013

Where have you been all my life?!?!

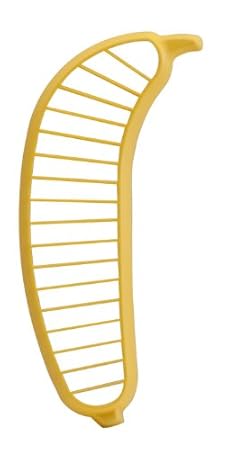
This morning I was looking at something on Amazon, and one of the "customers who bought this item" images caught my eye.


How have I lived for more than 40 years without one of these? According to Amazon, this is "faster and safer" and "great for cereal". You can slice your banana with one quick motion! Seriously, think how much time I've wasted over the years using a knife to slice up bananas. And the peril I've put myself through using a paring knife while holding the banana and slicing against my thumb. It's a miracle I've made it this far without serious injury.

And furthermore, Amazon has made me realize that I've been remiss in just throwing a banana into my knapsack and carrying it to work for lunch. Banana transport is a serious thing, and the Banana Bunker is just the item I need.
 

To keep my bananas safe, of course. 

Edited to add: This post was tongue-in-cheek. I figured that was evident, but someone who knows me quite well emailed to ask if I was serious!!!

Sunday, 14 April 2013

Kitchen table progress

I spent this weekend hard at work on our new kitchen table.


A couple of people have asked me about it recently and I figured that a month and a half was plenty long enough to procrastinate about it. It was all the fault of those curly legs - I was really not looking forward to stripping and sanding them. Luckily, I was able to disassemble the table to work on it so it wasn't nearly as bad as I feared.

I used Natura Safe Strip that I picked up at Home Hardware to take off the old finish. I was skeptical that it would work, but it did a pretty terrific job. The only drawback is that you have to leave it on for 30-60 minutes to allow it to break down the old finish. That slowed things down a bit, but it was nice to not have to worry about fumes and nasty chemicals.


I was a little concerned after I finished stripping and sanding the pieces as everything was a different colour. The stain was completely removed from the two upper legs, but I couldn't get the four small lower legs anywhere near as light. Even with multiple applications of the stripper.

And the table top was even worse.


I decided to cross my fingers and soldier on and applied the walnut stain to all of the pieces. And I was pleasantly surprised that the tone of the wood all evened out.


I managed to get one coat of satin finish polyurethane on this afternoon. Three more coats to go - each one needs to dry overnight, so by the end of the week the table should be all finished.

Then it's on to the bench that I currently have sitting in the bay window in the dining room. That's an even bigger point of procrastination because it involves upholstery, and it really looks like a two man job. I need my sister to hurry up and get home from Florida!

Friday, 12 April 2013

Championship cookies

This weekend Matthew's select team is playing in the city-wide hockey final. Win or lose, it's amazing that they've made it this far. I thought it would be fun to take some cookies in to celebrate after the game tomorrow. And what could be more fitting than Parkdale Flames team cookies?


I screen captured their insignia and copied the letters into a grid on white paper so that I could use it as a template to make royal icing transfers. I slid the papers into plastic sheet protectors, and greased the plastic with a little bit of Crisco so I could peel the letters off at the end. I then used black royal icing to outline them


and flooded the inside with white royal icing after leaving the black to dry for an hour or so.


The transfers need to remain uncovered for about 24 hours so that they become good and hard. They can then be stored indefinitely in an airtight container at room temperature.

I baked a batch of my regular sugar cookies and cut them out using a maple leaf cookie cutter. I outlined the edges of the cookies in black, and flooded them with red.


After letting the icing dry overnight, I attached to letter transfers with a bit of yellow icing and used a toothpick to drag it out to look like flames.


I figure they'll be great for the celebration of a win, or for consolation in case of a loss!


Tuesday, 9 April 2013

Bits 'n pieces

I got a number of loose ends tied up this weekend. The house was fairly quiet as Matthew's team was in a tournament and Select hockey playoffs, which amounted to seven games over three days. They won the playoffs, and are off to the championships next weekend. Then, thank goodness, the season is over! Although I do have to admit that I'm going to miss the weekend quiet time the hockey games afford me.

On a side note, I found out just last weekend that playoffs and championships are two different things. Who knew! My sister is probably cringing in horror as she reads this...

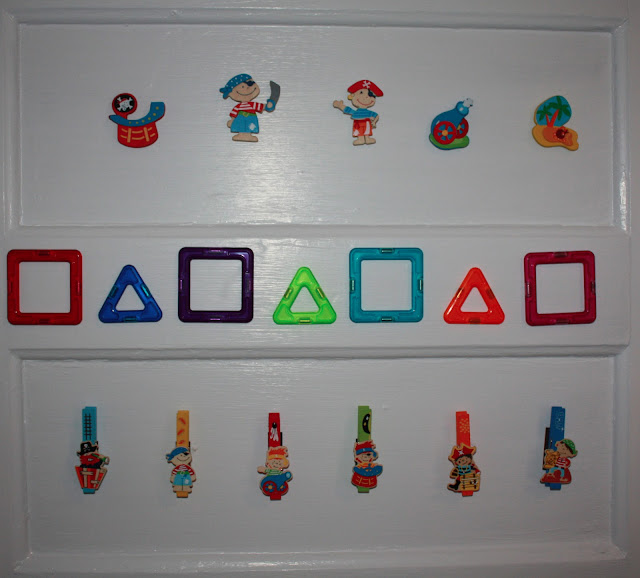
But back to the house - I finished putting three coats of semi-gloss white trim paint on the back of Cal's door. I was worried that the paint would be too thick and the magnets not strong enough to hold, but I was happily proven wrong. Lucky-for-me, my mom brought Cal a (late) birthday present that had a long strip magnet in it that I whisked away, chopped into pieces, and glued on to the back of the clothes-pins using my hot glue gun. It saved me a trip out searching for strip magnets.


We had some Magformers on the fridge in the basement, so I brought them up and divided them between the boys' rooms. The magnets in these are really strong, and there are three or four per Magformer, so they'll work well for holding up large or heavy papers. The magnet centers are now all ready for storing the assorted detritus of a small boys life. I'm sure they'll never look as tidy again.

The second thing I tackled was a set of antique nursery rhyme prints that I had sitting in a corner of our bedroom. I bought them when we were expecting Matthew and they hung in the nursery until I redid it for Cal last February. They were stuffed in a closet until the reno, whereupon they landed in the corner of our bedroom. And sat for eight months.


Even though the boys have obviously outgrown these whimsical prints, I haven't been able to part with them. But I've never liked the frames; they've always seemed rather insipid to me. I decided that I had nothing to lose, and whipped out my trusty can of black spray paint and gave them a quick coat.


I love how the dark frame contrasts with the bright colours and pulls out the black details. I figured that neither boy would feel that the nursery rhyme theme was sophisticated enough for their room, so I decided to hang them at the bottom of the basement stairs outside the bathroom door.


They really brighten up the landing at the bottom of the stairs. I hope they fare well there - Cal likes to play mini-sticks in this area, so there's a slight danger that a rebounding ball might take one out.  

And the last big chore we tackled this weekend was changing the light in our bedroom. We had the world's ugliest ceiling fan hanging over our bed. It came with the house, and we just never got around to replacing it with something more attractive. We didn't use the fan - I could never go to sleep under a spinning fan. Especially this fan, which creaked and wobbled even at low speed. I had visions of it falling from the ceiling and slicing us to ribbons in our sleep.

To make it even uglier, about a year and a half ago when I was moving our giant Ikea Pax wardrobes around the room I pushed one of them into the light, broke the globe, and knocked the bulb askew. And so it sat for the next 18 months.

I bought a new hanging fixture about six months ago, but we haven't managed to install it yet. We've discussed it many times, planned for it several weekends, but it seems to be the elusive task we never got around to. On the weekend we decided to just do it.

Alan was too quick for me, so I didn't get a before picture, but here's a shot of the (very dusty) disassembled fan. You can imagine how attractive it was hanging above our bed.


And after all this time, the 30 minute job didn't get finished. When we pulled the old light down we were faced with this


Those of you who own old houses probably recognize this - knob and tube wiring and no junction box. It's a recipe for fire. 

So now we need to install a junction box and pull new wire through from the switch to the fixture. But that, my friends, is a job for another day.

Saturday, 6 April 2013

We are the Champions

The Parkdale Flames Novice champions, that is. Cal as a defenseman and Alan as assistant coach.


The "banquet" was this morning, and was Cal ever excited to get his trophy.


Wonder if he'll take after his cousin Alex who plays for the University of Michigan and is currently deciding whether to accept a contract from the Dallas Stars?!?! We're all dying to know what his decision will be!

Thursday, 4 April 2013

Magnetic organizing for the boys

I haven't been posting much for the past few weeks; while I've been busy doing stuff around the house, it seems that it's a bit of this and a little bit of that, and I'm not actually finishing any projects.

One thing that I've been working on is organizing the boys' rooms. In particular, they have a lot of papers that they want or need to save, that currently land in messy piles on their desks. Last weekend the Easter Bunny delivered some adorable wooden pirate magnets and clothespins for Cal


and some space-themed ones for Matthew.


I had a pint of magnetic primer that I picked up at Christmas time hanging around in the basement so I cracked it open and slapped some up on the back of Cal's door. I figured that using the back of the door has two advantages: it's basically wasted space in the room, and I won't have to see the clutter when I walk by in the hallway.


The magnetic primer is very dark. It's also very heavy - the little pint can weighs about a gazillion pounds and when the guy in the paint store handed it to me I almost dropped it on my toes as I wasn't prepared for the weight. It makes sense seeing how it's full of iron particles, but that thought hadn't crossed my mind when I was grabbing the can. 

I didn't tape the edges when I was painting since I plan to repaint the door white, and I figured that the edges would feather in better and be less obvious if I didn't use tape. I put up five coats of the primer so that the magnets would stick well. The side of the can says that you should do three coats and then  cover with two coats of latex, but I have my doubts that two coats of white will be sufficient. I hedged my bets by applying five coats of primer, and I'm keeping my fingers crossed that the magnets will still work once I have the painting all done.

When Matthew saw Cal's door all primed, he decided that he liked the blackboard-like look of the paint, so I taped off the area on the back of his door that I wanted to fill in and used the old anti-bleeding trick of putting a coat of the base colour around the edges of the tape to seal it up well.


Four coats later, and the door is finished.


It provides a lot of hanging space for papers and Blue Jay Schedule magnets. Am I ever happy that I won't have to stare at that on my fridge for the whole summer like I've had to every baseball season for the past decade! 

I still need to pick up some magnets to glue to the back of the clothespins so that they can be used to hang papers. And I noticed when I was painting that poor Matthew had no doorknob on his door. I guess I must have forgotten to put it back on after I finished painting his room last year! That'll be task #1 on my list this weekend.


Related Posts Plugin for WordPress, Blogger...