Showing posts with label DIY. Show all posts

Sunday, 7 September 2014

The magical bench

The deck is almost finished now. There's just a little work still to be done on the doors that close in the lower side where we put the garbage and recycling bins and we're waiting for the glass railing to be installed, but we've been using it a lot this week. With summer finally arriving and all. In fact, I'm sitting on it right now enjoying the warm sun and my morning coffee. 

I'm soooo happy that I happened to see the idea for putting a bench seat along the side to cover the garbage bins. It's like it was fate. It not only puts our bins in a really convenient spot, it also makes great seating in what might otherwise be a dead space along the side by the door. 


We continued the horizontal rough cedar along the front edge of the bench. We thought about using the decking and running it vertically to match the floor, but I decided that I'd rather have the stair walls wrap along in one continuous line. 


We used the smooth decking material for the top of the benches, and have three hinged lids, each of which perfectly fits two garbage/recycling bins. This weekend I rigged it up so that the lids of the bins are attached so that when we lift the seat we don't have to bend in to lift them. It was pretty simple to do using a few eye hooks and some chandelier chain that we had down in the basement. 


I attached the large eye hooks to the lid of the recycling bins. Luckily, the bins come with a hole in the centre of the front of the lid, so I didn't have to bother with any drilling. The holes were a little large, so I used a couple of washers to keep the eye hooks in place. Then I screwed a small eye hook into the bottom of the bench seat and attached a length of chain to it. 


My original plan was to use S-hooks to attach the chain to the eye hook in the bin, but then I realized that I could just bend the last link on the chain and fashion a hook that would be permanently attached. 


These ends hook onto the lid of the cans and pull the tops of the bins open when the seat is lifted. Like magic. (...or physics). 


The hooks seem to stay attached to the bins after repeated lifting and lowering of the seat. We haven't tried unhooking them from the side yet, but I think that there should be plenty of length to manoeuvre them into a position where you can easily unhook them. 

Next up is deciding what to do for the bench. I originally thought that I would have seat cushions along the length, but I think I've changed my mind about that. The bench is just under 12 feet long - that's a lot of cushions to store when it rains and over the winter. Plus the height of the bench feels perfect to me now and I think that extra height might be less comfortable. The seats are very deep though, and the rough cut lumber kind of sticks to your clothes when you lean back, so I think that I might make some cushions for the back. I tried out the ones from our outdoor sofa and they were just about perfect. 


I think I'll wait and see if we really want cushions here though; I'm afraid that they might be more of a pain than they're worth. It's going to be a struggle to find space to store the ones we have now over the winter, and can't imagine almost doubling the amount of space we need. And since winter is all-too-quickly approaching, this is a decision that can easily be put off until next spring! 

Saturday, 2 February 2013

Winter wreath


I was planning to make a wreath for Valentine's Day. After making the Santa wreath for Christmas, I got used to having one hanging on the front door, and it looked kind of bare without one.

I walk by a florist on my way to work that has some beautiful feather wreaths hanging in the window. I stopped in to take a look, but they were really pricey. I had seen some inexpensive feather boas in a store in Chinatown, so I decided to try making one myself.


True to form, I had a heck of a time finding any kind of wreath form downtown, so I resorted to buying a wire form and covering it myself using quilt bat and strips of white cotton that I had hanging around in with my sewing supplies. I just used safety pins to hold the ends of the fabric down - once the form is covered by the boas you can't see them anyway.


I pinned down the end of one boa, and then proceeded to wind it loosely around the wreath. When I came to the end of one boa, I used the bit of cord that the boa is constructed with to tie it to the end to the next boa. I used three of them. They were quite flimsy and sparse - if you had thick boas you might only need two. When I reached the end of the third boa, I used another safety pin to attach it to the wreath form.

Since I had planned this for Valentine's Day, I also picked up the heart circle thing you can see in the pictures, thinking I would somehow suspend it in the middle of the wreath. When I finished wrapping with the white boas, I really liked it as it was, and decided to forgo the hearts. So it's a winter wreath, not a Valentine's wreath.


To hang it I used a length of white organza ribbon, tying the ends of it around the wreath and then fluffing the feathers back out around it.

Not bad for 20 minutes work.


Sunday, 20 January 2013

A thing of beauty

Well, after a couple hours of elbow grease yesterday, I have a beautiful new finish on my dining room buffet.


And sore arms to boot. Since it was only the top that needed sanding and I didn't want to (and couldn't, alone) move it out to the porch, I sanded it by hand. I have belt and random orbital sanders, but I find that they kick up way more dust than sanding by hand does. The sanding is faster, but the cleanup takes so.much.longer. When I sand by hand I just keep the vacuum nearby and suck up the little piles of dust as I go.

So I spent a little more than an hour sanding it down, and about three quarters of an hour applying two coats of lemon oil to go from this


to this.


The difference is almost impossible to believe - I should have tackled this project several years ago!

Unfortunately, now my china cabinet looks extra bad by comparison.....

Wednesday, 12 December 2012

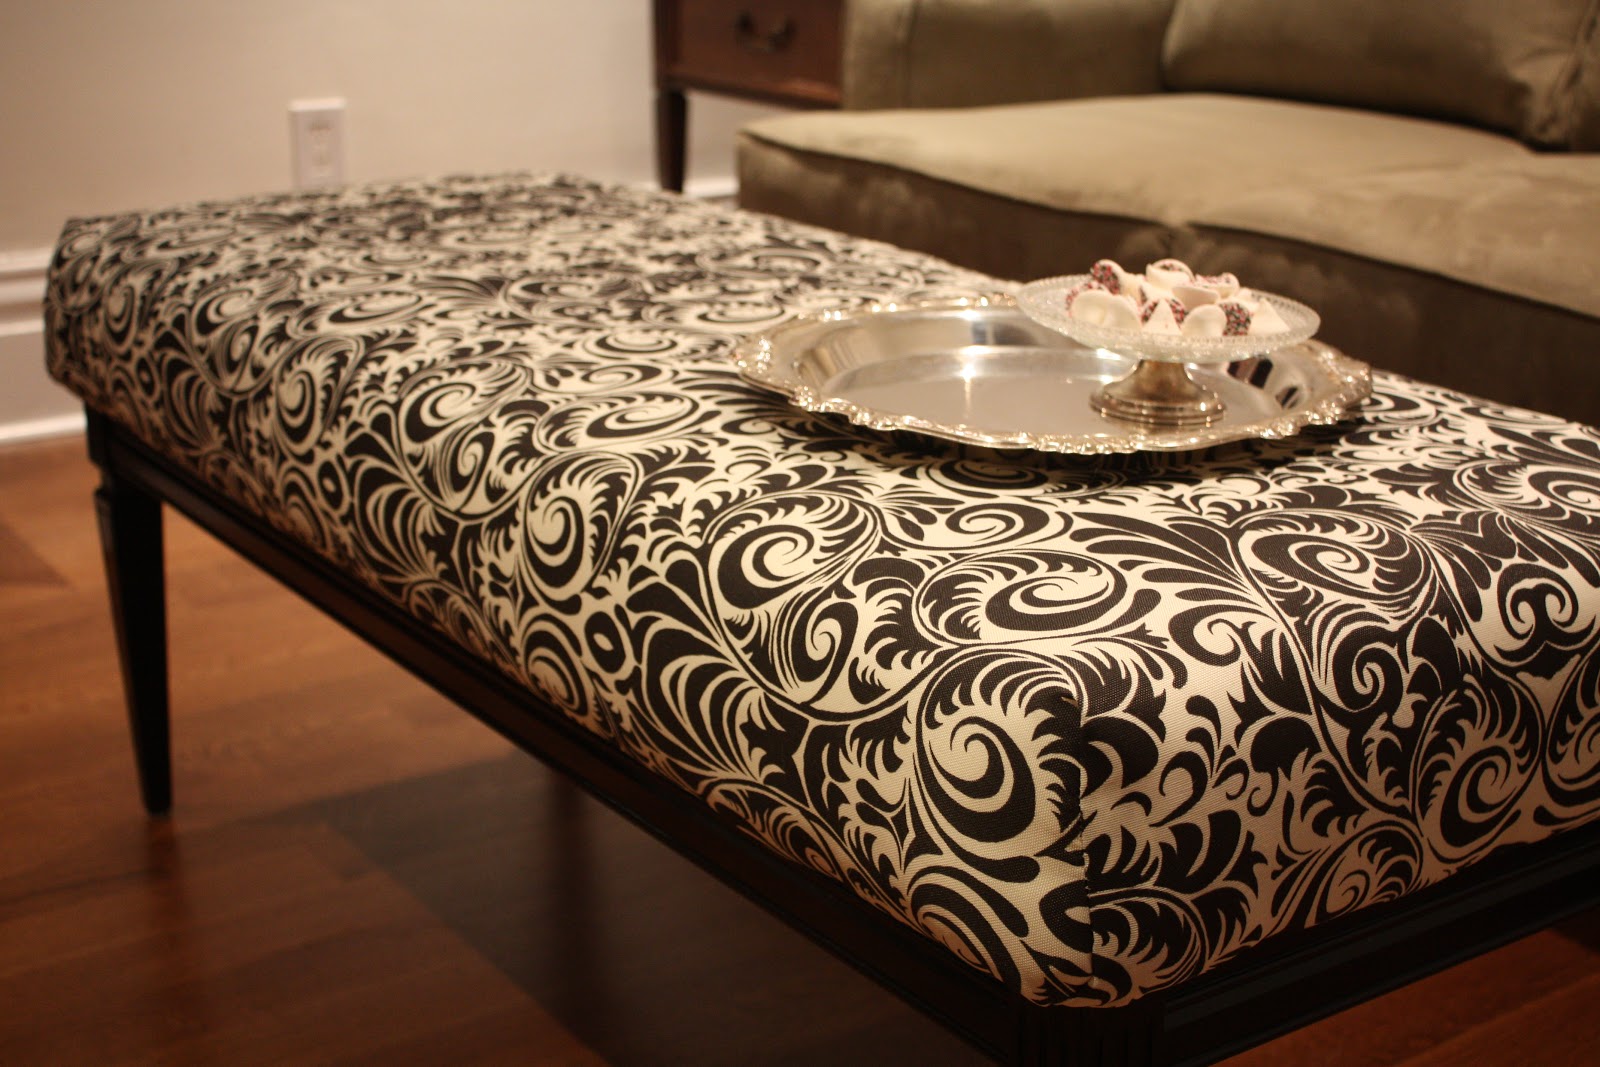
Table to bench makeover

I've been itching to try out one of those table-to-bench makeovers that keep popping up all over the blogosphere. And I found the perfect table to do it with.


It has solid wood legs with beautiful detail. The top, however, seems to have been replaced at some point in time. It's made of wood pattern laminate-covered pressboard with some crazy kind of brown plastic edging. So there were no feelings of guilt about butchering it if the whole bench thing didn't work out. Plus, it was free.


 I unscrewed the top and pulled it off so that I could paint the base. Glossy black, of course.


I picked up a piece of firm, 4" thick foam to use for the seat. I had a hard time deciding between 2" and 4", but decided to go for the thicker one. While I plan to use it as a coffee table (with a tray on it so you can put a drink or food down on a steady surface) it will be handy to have for extra seating. So I wanted it to be comfortable.

To cover the cushion, I cut the fabric about 30 cm bigger than needed to cover the top and sides of the foam so that I had enough fabric to wrap it around and under the table top. Then I put the top on the table with the foam and a layer of cotton batting (to soften the squared edges of the foam) on top.

I used the same fabric that I covered the kitchen stools with, so that the pieces coordinate. I put the fabric on the table wrong-side up and pinned and marked the corners so that I could sew them and get a nice, neat, fitted corner.


After sewing the corners, it was a quick job to flip the cover right side out and staple it onto the table top. I did this with the top removed from the table, and then reattached it to the legs after the covering was complete.


I planned to put this in the family room, but I have it in the living room right now. I like it out there, and we don't have a table for that space yet as our old living room was far too narrow and crowded for a coffee table.

I have a small tray to use on it right now, but am keeping my eyes out for something larger. I'm not worried about balancing drinks on the tray as the material is an outdoor fabric, so it'll clean up well if something happens to get spilled on it.

Not too shabby for a couple of hours work!

Sunday, 9 December 2012

New kitchen stools

The past week went by in a flash. We had our lab Christmas party last night, with about 40 guests. The prep for it almost killed me, but on the bright side, most of our Christmas decorating is now complete.

And some of my Christmas baking is done. On Friday I enlisted the help of two of my favourite people for that.


I've been on a bit of a tear with re-upholstering things this month. Last week I got some new (to me) stools for the island in the kitchen. We had some that I got for Christmas one year from Janine when I was a grad student, but they were a bit modern for our kitchen. They've served us well, as they seem to be covered in some miraculous finish that stands up well to the abuse of two small boys. They look as good now as when I got them 13 or 14 years ago even though we use them every day.


I've been keeping my eyes open for ones that have a bit of an antique feel to them. Last week I came across these beauties


Hard to believe that anyone would get rid of them, with their lovely straight-from-the-80's fabric covering.


I popped off the seat and made new covers for them. They aren't perfect as I didn't bother taking apart the old covers to use as a pattern - I just flew by the seat of my pants. They turned out pretty well, though.


When I picked the stools up I thought I would paint them black to coordinate with the fabric. But I kind of like them with the dark wood, so now I can't decide. Any votes one way or the other?


Sunday, 2 December 2012

A quick dining room chair makeover

Both the chairs and the love seat in our dining room were screaming for a new upholstery job.


Having the loveseat covered with that fabric in my house makes me feel like an old lady lives here. And the fabric on the chairs was so very dull and mossy green.


 I enlisted Matthew's help for a quick makeover of the chairs. He's starting to be pretty handy with the tools.


Matthew unscrewed all the seats from the chairs, I stapled on the new fabric and then he helped me reattach the seats. We had a fresh, crisp new look in less than 30 minutes. 


The chairs could stand to be stripped and refinished, but that's far down the list of priorities at this point in time.

I haven't started on the love seat yet. That job is a bit daunting - I think I'll tackle it over the Christmas break when I'm home with the kids for a couple of weeks.

Friday, 9 November 2012

And the winner is.....

Remember this chair that I started to refinish for the basement bathroom? 


And I was trying to choose a fabric to cover the seat? The owls had a lot of support. 


They didn't win out. I've been dragging my butt about placing an order with Tonic Living. Tonight after work I went for a run and found myself running past Designer Fabrics down on Queen St. I decided to pop in and look to see if they had anything that I liked.

They had some sort of colourful owl fabric, but it wasn't nearly as cute as the one above. I thought that it was the same as the Tonic Living one, and decided that I didn't like it (partly because the owls were printed on a creamy background, and I wanted white) and should choose something else. So I did. 

Thankfully I had my credit card with me. I always slip it in my pocket when I go for a run so I have some form of ID on me in case I get hit by a car. Or, you know, see something cute in a store window that I just have to buy.


So I picked up a half a yard of material, trotted home, pulled out my staple gun, and lickety-split had a finished chair on my hands.


I love how crisp and clean the the simple graphic pattern is. 


And here it is all folded up. 


Next up, painting the front door. It's starting to stick, probably from the raw wood absorbing moisture. Yikes!!

Related Posts Plugin for WordPress, Blogger...